1. Raw Material Preparation
Material Selection: The primary material is almost always polypropylene (PP) or sometimes polystyrene (PS). These plastics are chosen because they are:
Durable: Can withstand outdoor UV exposure (if UV-stabilized is added), moisture, and physical handling.
Flexible: Has some give to allow seedlings to be "pushed" out from the bottom without cracking the tray.
Cost-effective: Relatively inexpensive and easy to mold.
Recyclable: Many manufacturers use recycled plastic (post-industrial or post-consumer) as part of their raw material mix.
Material Form: The plastic is supplied as small pellets or granules, often called resin.
Colorant: Masterbatch (a concentrated mixture of pigment and carrier resin) is added to the natural plastic pellets to give the tray its final color (typically black, which is good for soil warmth and UV resistance).
2. The Core Manufacturing Process: Injection Molding
This is a high-volume, automated process.
Step 1: Feeding and Melting
The blend of plastic pellets and colorant is fed from a large hopper into the barrel of the injection molding machine.
Inside the barrel, a large reciprocating screw turns, moving the pellets forward.
As they move, they are heated by electrical bands around the barrel until they become a molten, viscous liquid (around 200-300°C / 392-572°F).
Step 2: Injection
The screw acts as a plunger. It pushes forward rapidly, injecting a precise amount of the molten plastic under high pressure (anywhere from 500 to 20,000 psi) into a tightly closed, cooled mold (or tool).
Step 3: The Mold - The Heart of the Process
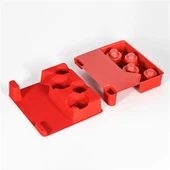
The mold is a custom-made, hardened steel tool, machined to the exact inverse shape of the seedling tray. It consists of two halves:
The "A" Side (Cavity): Forms the top, open face of the tray and the cells.
The "B" Side (Core): Forms the intricate details on the bottom of the tray, including the drainage holes, strengthening ribs, and labeling.
Creating the drainage holes requires core pins. These are thin, rod-like components in the mold that create the holes in each cell. The plastic flows around them.
The mold is connected to a cooling system that circulates water or oil to solidify the plastic rapidly.
Step 4: Cooling and Solidification
The molten plastic is held under pressure inside the cool mold (dwell time). This allows the plastic to completely fill the mold and then solidify, taking the exact shape of the cavity and core.
Step 5: Ejection
After a set cooling time, the mold opens.
Ejector pins, built into the mold, push forward and gently nudge the now-solid plastic tray out of the mold cavity.
Robots or automated arms often reach in to remove the finished tray and place it on a conveyor belt to avoid any deformation while it's still warm.
Step 6: Runner and Sprue Recycling
The mold has channels (runners and a sprue) that allow the plastic to flow from the injection machine nozzle into the mold cavity. This excess plastic solidifies along with the part.
This excess material is typically trimmed off the finished tray automatically and fed back into the hopper to be re-ground and re-used, minimizing waste.
3. Post-Processing and Quality Control
Trimming: Any remaining flash (thin bits of plastic that seeped into the seams of the mold) is trimmed away.
Stacking: The trays are designed to nest or stack for efficient storage and shipping. They are automatically stacked into tall piles.
Quality Control (QC): Throughout the process, QC checks are performed:
Dimensional Checks: Ensuring cell size, overall length/width, and wall thickness are correct.
Weight Check: Weighing random trays to ensure the correct amount of plastic was used.
Visual Inspection: Checking for defects like incomplete filling (short shots), discoloration, or warping.
Function Test: Ensuring drainage holes are clear and that trays stack neatly.
4. Packaging and Shipping
The stacked trays are bundled together, usually with plastic stretch wrap or strapping, to form a stable unit.
They are then packed into large cardboard boxes or directly onto wooden pallets for shipment to distributors, nurseries, and agricultural suppliers.
Alternative Manufacturing Methods
While injection molding is dominant for standard plastic trays, other methods exist:
Thermoforming: Used for simpler, thinner trays. A sheet of plastic is heated until pliable and then vacuum-formed over a mold. This is common for disposable trays used in large-scale horticulture. It's generally less expensive for the tooling but can produce a less durable product.
Pulp Molding ( biodegradable trays): For eco-friendly trays, a slurry of recycled paper pulp (or other fibers like bamboo) is sucked into a mesh mold under a vacuum. The water is removed, and the pulp is heated and pressed into a rigid, biodegradable tray. This process is very different from plastic molding and is akin to how egg cartons are made.